
How an eSIM works, from checkout to connected abroad
A step-by-step account of what happens after checkout: installing on iPhone and Android, when validity starts, and the order to work through if there is no signal.
A travel eSIM is a second line on the phone you already own. You pick a plan for the destination, pay, get a QR code by email, install the profile while you still have internet at home, then enable that line and switch its roaming data on after you land. Installing does not start the clock: validity begins when the phone first registers on a network at the destination. Your home SIM stays in the phone for calls and SMS one-time codes.


Last updated October 18, 2026

What an eSIM actually is
An eSIM is a carrier profile written onto the eUICC chip inside your phone. It does everything a SIM card does; it simply arrives as a download instead of a piece of plastic. Once the profile is on the device, the phone holds the credentials it needs to attach to a network at your destination.
What makes a travel eSIM useful is that it is a second line on the same handset. Your home SIM stays in place and keeps taking calls and texts, while the eSIM line carries data only.
The four steps from checkout to data
- 1Choose the planPick by destination or region, then read the spec table: which networks it uses, how many days it lasts, when the clock starts, and whether hotspot sharing is allowed.
- 2PayWe order from the supplier only after payment succeeds. Each order carries an idempotency key, so pressing the button twice or refreshing the page does not create a second order.
- 3Install the profileScan the QR code or tap the install link in the email. This needs internet, so do it at home before the flight. Installing does not start the validity clock.
- 4Turn it on at the destinationAfter landing, leave airplane mode, enable the eSIM line, switch roaming data on for that line, and set it as the mobile data line.
Installing on iPhone
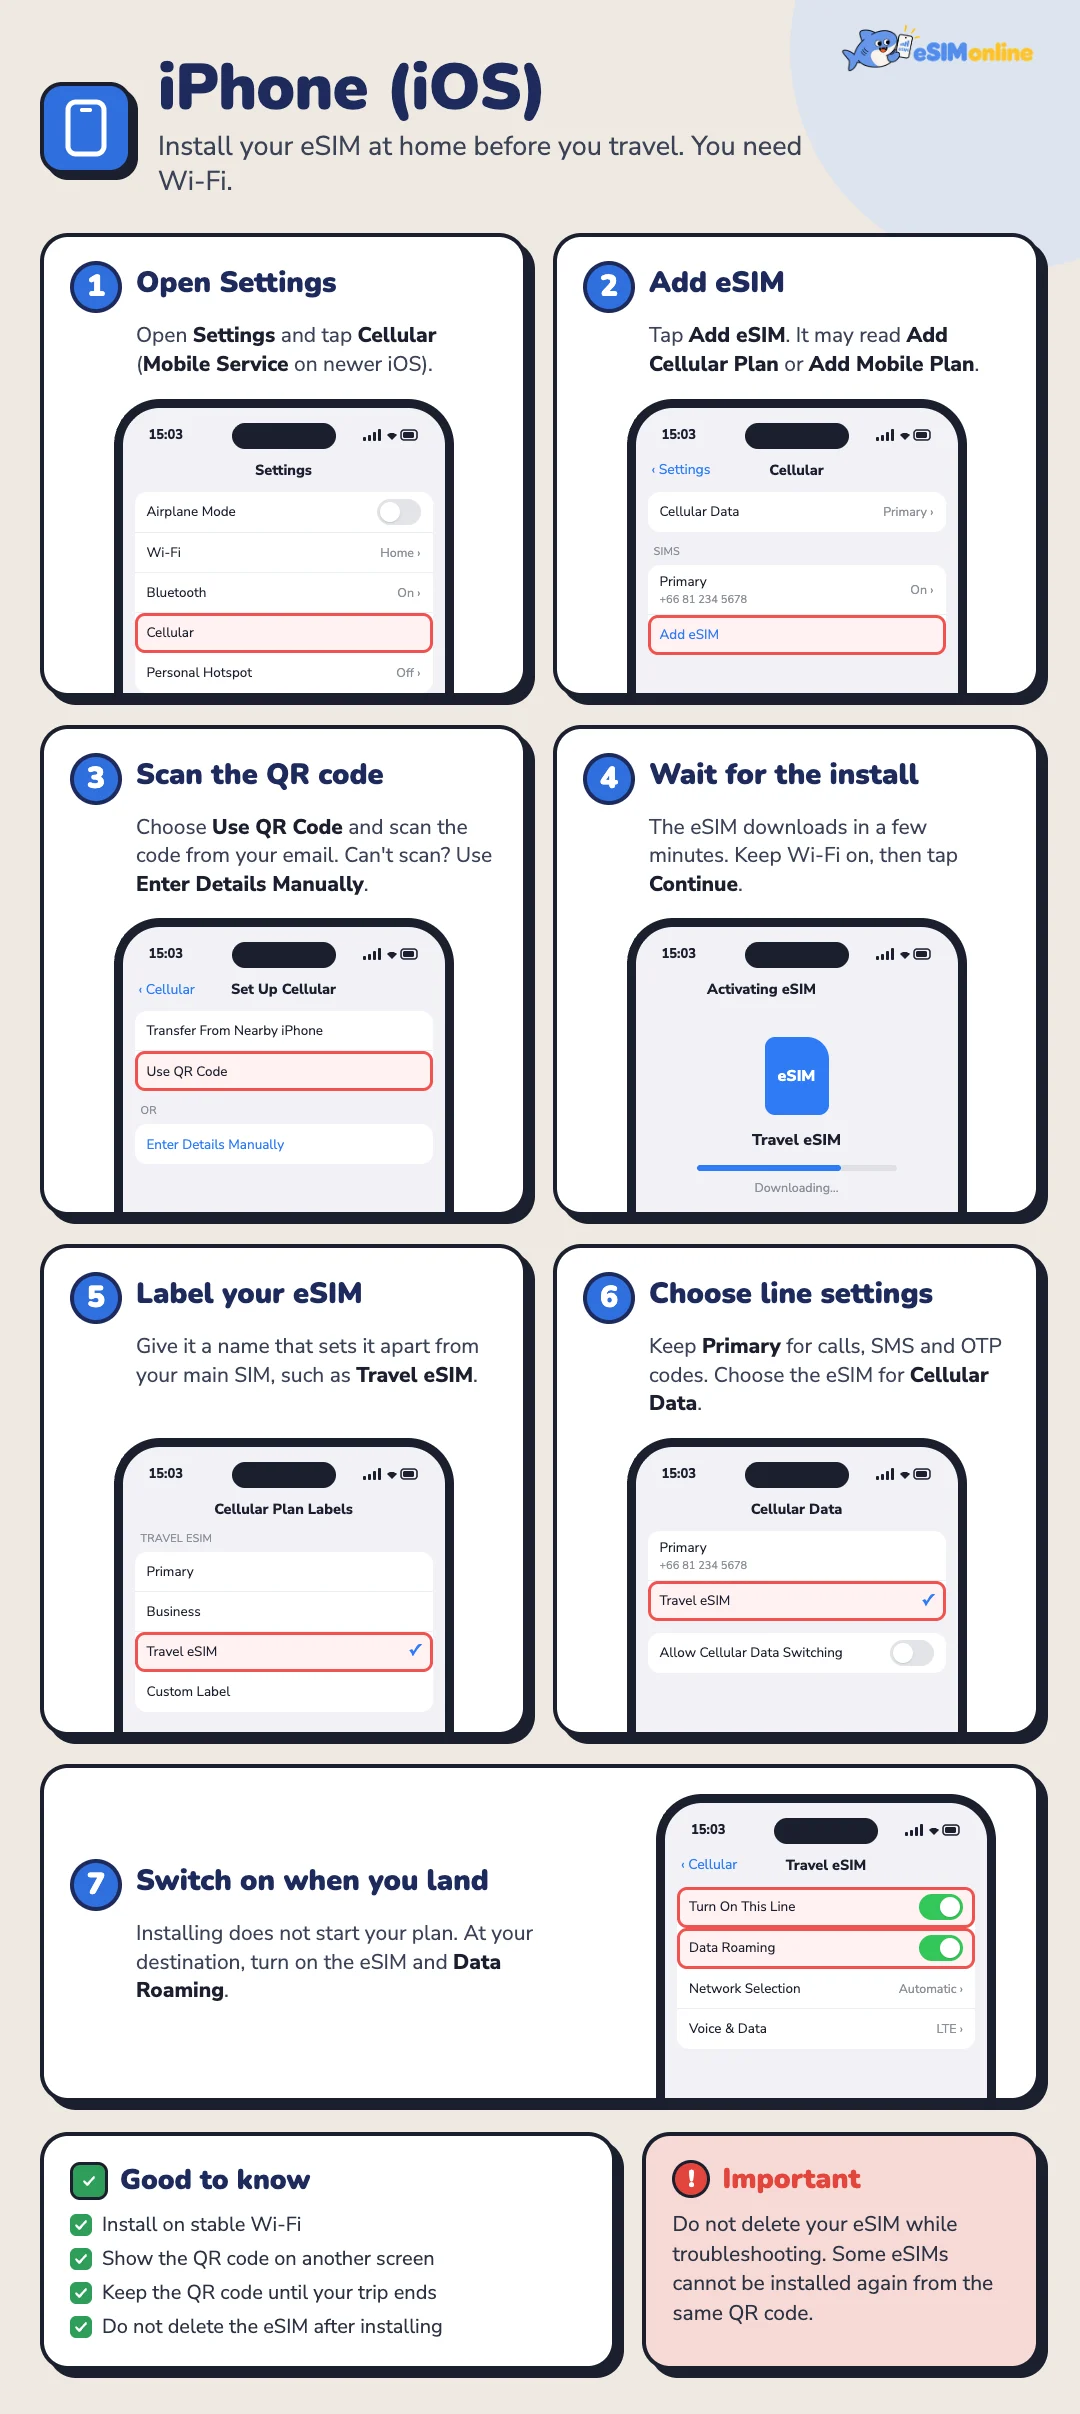
Using an eSIM on iPhone happens in two stages: installing the profile at home before you travel, which needs internet, and turning it on when you arrive. The menu names below are the ones iOS shows in English; newer versions call Cellular "Mobile Service", and some regions call it "Mobile Data".
Before you travel: install the eSIM
Connect to stable Wi-Fi and open the order confirmation email with your QR code on a second screen or a printout, because the iPhone cannot scan a code shown on its own display.
- Open Settings and tap Cellular (Mobile Service on newer iOS, Mobile Data in some regions).
- Tap Add eSIM. On phones that already hold several lines it may read Add Cellular Plan or Add Mobile Plan.
- Choose Use QR Code and scan the code from the email. If scanning fails, choose Enter Details Manually and type the SM-DP+ address and activation code from the same email.
- Wait while the phone downloads and installs the eSIM, which takes a few minutes. Do not turn off Wi-Fi or leave the screen; tap Continue when it finishes.
- Label the eSIM so you can tell it apart from your main SIM, such as Travel eSIM or the destination country.
- Set how each line is used: keep your main SIM (Primary) as the Default Voice Line for calls, SMS and OTP codes, and choose the eSIM for Cellular Data.
- Switch on when you land: installing does not start the plan, so leave the eSIM line off for now and turn on the eSIM and Data Roaming at your destination, as the next section shows.
Using your eSIM on iPhone at your destination
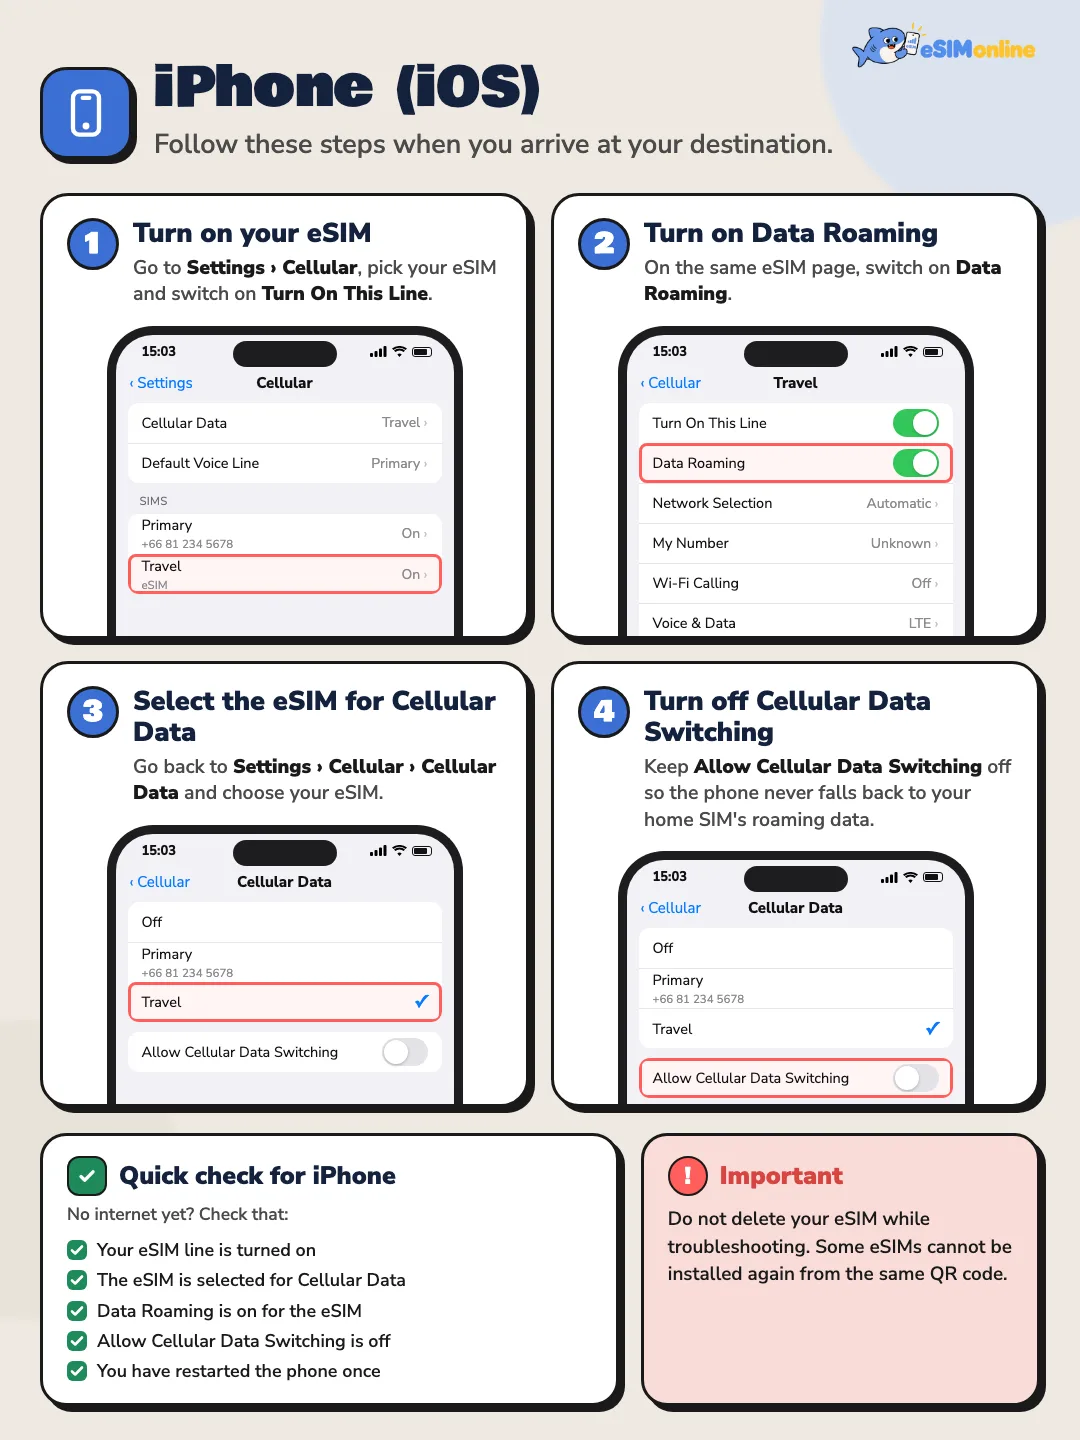
Follow these steps once you reach your destination. You do not need Wi-Fi; do them as soon as you land.
- Turn on your eSIM: go to Settings > Cellular, pick your eSIM and switch on Turn On This Line.
- Turn on Data Roaming: on the same eSIM page, switch on Data Roaming.
- Select the eSIM for Cellular Data: go back to Settings > Cellular > Cellular Data and choose your eSIM.
- Turn off Allow Cellular Data Switching on that same screen, so the phone never falls back to your home SIM's roaming data.
Give the phone 1 to 5 minutes to find a network; once connected, the local operator's name and signal bars appear in the status bar. Keep Data Roaming off on your main SIM so your home operator cannot bill roaming.
No internet on iPhone? Check these five
- Your eSIM line is turned on (Turn On This Line)
- The eSIM is selected for Cellular Data
- Data Roaming is on for the eSIM
- Allow Cellular Data Switching is off
- You have restarted the phone once
Installing on Android
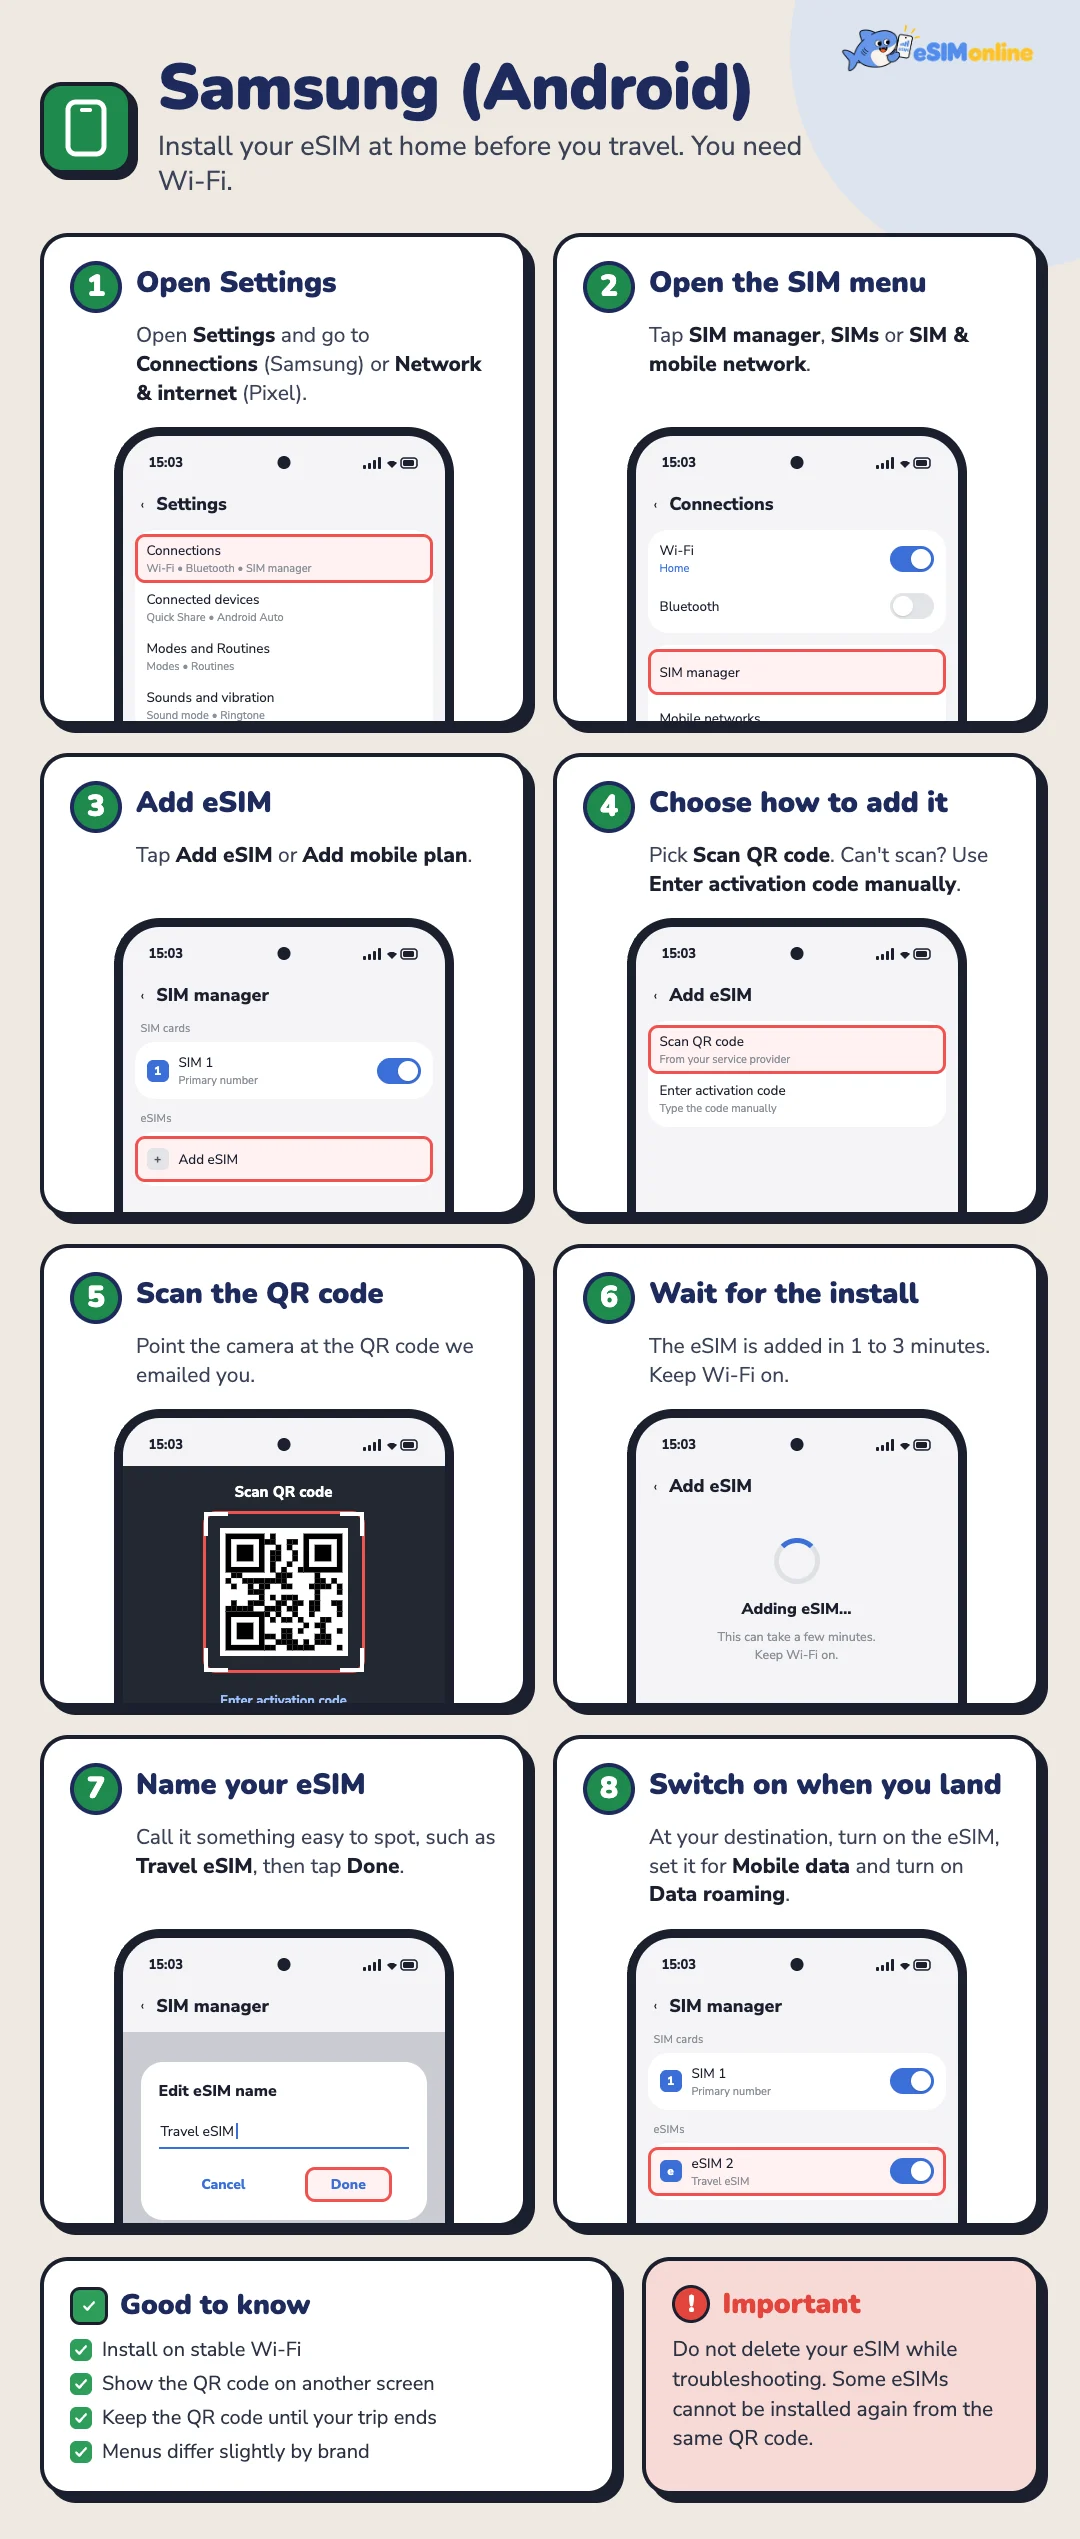
Android menus differ by manufacturer, but the route is similar. It generally lives under Settings, then Network and internet, or Connections.
The steps below use Samsung's English menu names as the example; the table at the end of this section gives the path for other brands.
Before you travel: install the eSIM
Connect to stable Wi-Fi and open the order confirmation email with your QR code on a second screen or a printout.
- Open Settings and go to the network menu: Connections on Samsung, Network & internet on Pixel.
- Open the SIM menu, called SIM manager, SIMs, or SIM & mobile network depending on the phone.
- Tap Add eSIM or Add mobile plan.
- Choose Scan QR code. If scanning fails, choose Enter activation code manually and type the code from the email.
- Scan the QR code we sent you by email.
- Wait 1 to 3 minutes while the phone downloads and adds the eSIM. Keep Wi-Fi on throughout.
- Name the eSIM something easy to spot, such as Travel eSIM or the destination country, and tap Done.
- Switch on when you land: keep your main SIM for Calls and Messages so calls and OTP codes still arrive, and leave the eSIM off for now. At your destination, turn on the eSIM, Mobile data and Data roaming as the next section shows.
| Brand | Typical menu path |
|---|---|
| Google Pixel | Settings > Network and internet > SIMs > Download a SIM instead |
| Samsung Galaxy | Settings > Connections > SIM manager > Add eSIM |
| Xiaomi | Settings > SIM cards and mobile networks > Add eSIM |
| OPPO and vivo | Settings > Connection and sharing > SIM card and mobile data > Add eSIM |
Menu paths vary with the operating system version.
Using your eSIM on Android at your destination
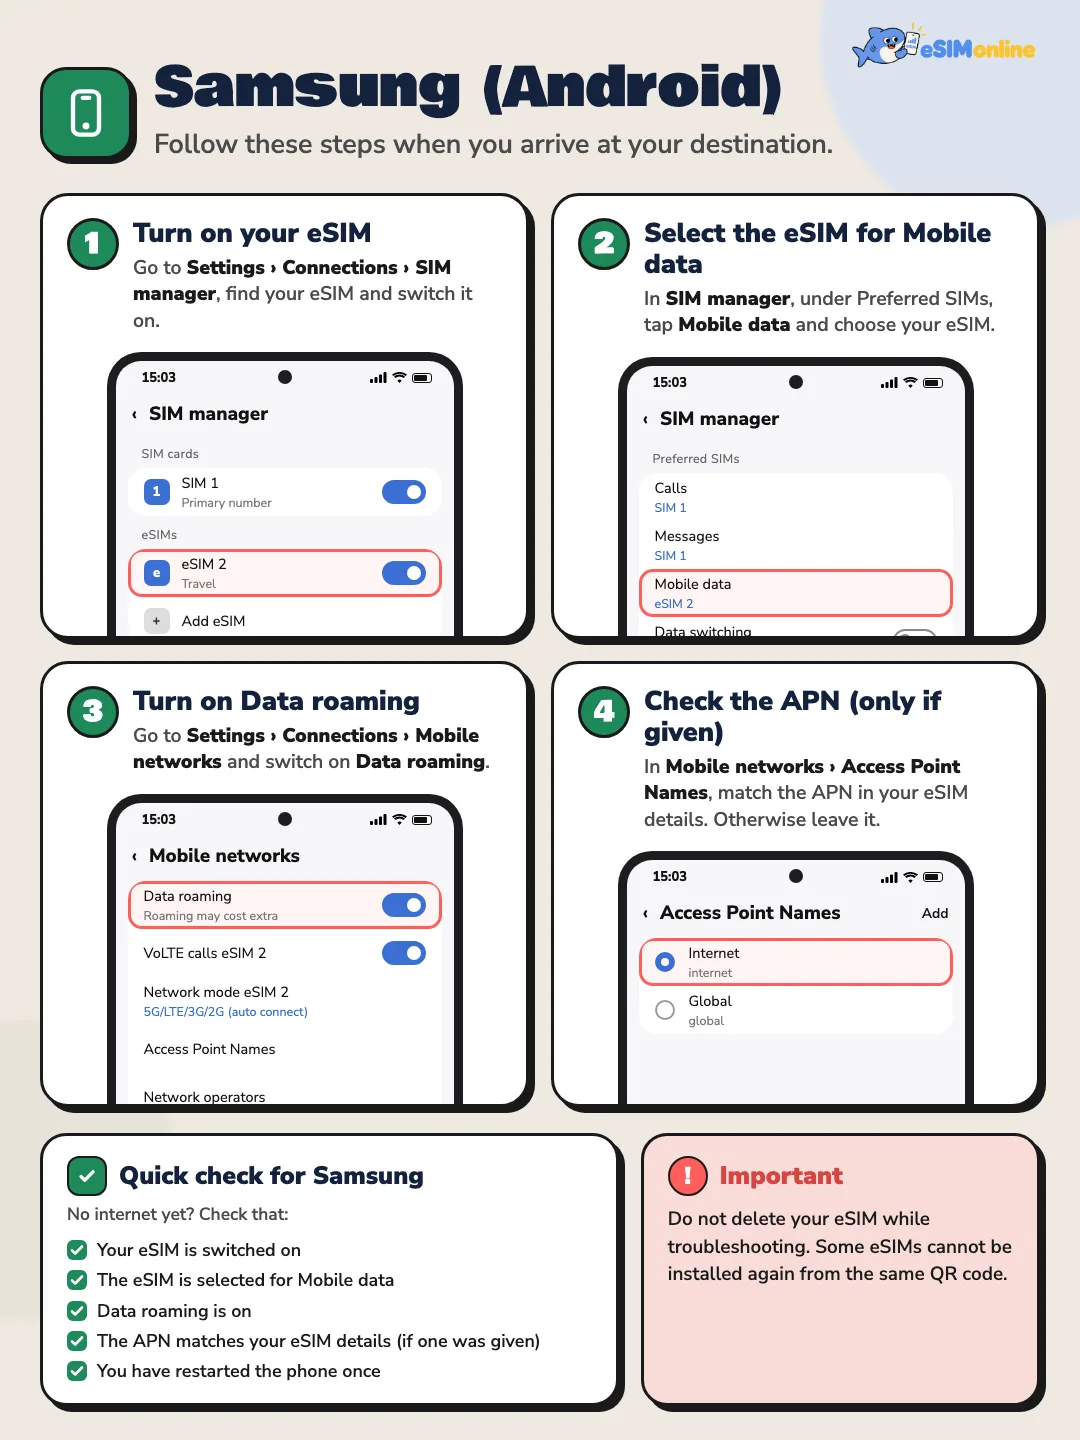
Follow these steps once you reach your destination. You do not need Wi-Fi; do them as soon as you land.
- Turn on your eSIM: go to Settings > Connections > SIM manager, find your eSIM and switch it on.
- Select the eSIM for mobile data: in SIM manager, under Preferred SIMs, tap Mobile data and choose your eSIM. If Data switching is shown, turn it off.
- Turn on Data roaming: go to Settings > Connections > Mobile networks and switch on Data roaming.
- Check the APN (only if one is given): in Mobile networks > Access Point Names, match the APN in your eSIM details. If none is given, leave it as it is.
On a Google Pixel, go to Settings > Network & internet > SIMs, tap the eSIM and switch on Use SIM, Mobile data and Roaming on that one page. Once connected, the local operator's name appears in the status bar within a few minutes.
No internet on Android? Check these five
- Your eSIM is switched on
- The eSIM is selected for Mobile data
- Data roaming is on
- The APN matches your eSIM details (if one was given)
- You have restarted the phone once
When the validity clock starts
Plans fall into two families: those that start on first connection at the destination, and those that start at purchase or at system activation. Every spec table states which, because the difference moves the expiry date substantially.
- Days are counted as calendar days in the provider's time zone, not accumulated hours, unless stated otherwise
- Daily plans reset full-speed data every day; the remainder does not carry over
- Leftover data on a fixed plan disappears at expiry
If you land and there is no data
Work through this order; most cases resolve in the first three. Do not delete the profile — once removed it cannot be reinstalled.
- Toggle airplane mode for ten seconds to force a fresh network search
- Check the eSIM line is enabled and that its roaming data is on
- Set the eSIM line, not your home line, as the mobile data line
- Select a network manually from the operators the plan lists
- Check the APN against the order email; if none is given, leave it blank
- Restart the phone once
- If it still fails, contact us with the order number, handset model and a screenshot of the cellular settings
Checking how much data is left, and what happens when a GB plan runs out
After you buy, you can see how much data is left yourself, from the link in your order email or from the account page on the site. It shows the data left, the data used and the total for each eSIM, with a Refresh button for the latest figure.
Example: plenty left
4.1 GB left
Used 5.9 GB
Total 10 GB
41% remaining
Example: running low
0.8 GB left
Used 9.2 GB
Total 10 GB
8% remaining
A GB plan is a fixed amount of data. When it is used up, data on that eSIM stops, nothing is charged automatically, and the data you used does not come back by itself. You can top up the same eSIM from your order page with no reinstall and no new QR code. Below 20% a tag warns you that it is running low.
Top-ups and second profiles
Some plans accept a top-up on the existing profile, which is easier because nothing needs reinstalling. Where top-up is not supported, buy another plan and install it as a second profile on the same phone; recent iPhones store many profiles and can run two at once.
What we do not guarantee
- A speed figure, because it depends on the local network and congestion at that moment
- Coverage in remote areas, underground, or on ships and aircraft
- SMS OTP delivery on the eSIM line, since most plans are data-only
- Uninterrupted service if the destination operator suspends roaming temporarily
FAQ
Can I install weeks in advance?+
Yes, if the plan starts on first connection — though some QR codes have an installation deadline, which the email states.
Can I move the profile to another phone?+
Usually not; the profile is bound to the device it installed on. If you must change handsets, contact us before deleting anything.
Does it work on an iPad or tablet?+
Yes, if the device supports eSIM and is not carrier-locked. Check your model in our device checker.
Do I really need to enable roaming?+
Yes, but only on the eSIM line: travel plans work by roaming onto local networks. Keep roaming data off on your home line.
What if the data runs out before I fly home?+
Top up if the plan allows it, otherwise buy another. In the meantime Wi-Fi and your home line for calls still work.


Stuck anywhere? Talk to us
Call 089-942-0818 · LINE · WhatsApp · email esimonline.asia@gmail.com