
How to activate a travel eSIM on arrival: iPhone, Samsung and Android settings that get you online
You can install an eSIM before you fly, but data only works once you do three things at the destination: turn the eSIM line on, pick it as your mobile data SIM, and switch on data roaming. This guide gives the menus for iPhone, Samsung, Pixel, Xiaomi and other brands, a no-internet checklist, what SM-DP+ Status: DISABLED means, and the one thing you should never do.

Quick answer
- On arrival, do three things with your travel eSIM: turn the eSIM line on, set it as the SIM for cellular/mobile data, and turn on Data Roaming for that eSIM.
- On iPhone, also turn off Allow Cellular Data Switching so the phone does not fall back to your Thai SIM's data and run up roaming charges.
- If there is still no internet, toggle Airplane Mode for 10–20 seconds, wait 1–3 minutes, restart the phone and set network selection to Automatic. Do not delete the eSIM: most QR codes cannot be installed a second time.
How do you activate a travel eSIM when you land?
Activating a travel eSIM on arrival comes down to three settings that must all be right at the same time: the eSIM line is switched on, the eSIM is chosen as the SIM for mobile data, and Data Roaming is on for that eSIM. Miss any one of them and the phone may show signal bars while no data flows.
Installing an eSIM (scanning the QR code) and activating it are separate steps. Installing downloads the eSIM profile to the phone, which you can do in Thailand before the flight. Activating means telling the phone to use that profile to connect to a partner network at the destination. esimonline eSIMs are data-only with no phone number, so there is nothing to set up for calls or SMS on the eSIM itself.
- Turn the eSIM on: on iPhone it is the Turn On This Line switch; on Samsung it is the switch next to the eSIM in SIM manager.
- Select the eSIM for mobile data: on iPhone under Cellular Data; on Samsung under Preferred SIMs (Primary SIMs on newer builds) > Mobile data.
- Turn on Data Roaming for the eSIM: most travel eSIMs connect through a partner network at the destination, which the phone treats as roaming.

Can you install the eSIM before you leave?
Yes, and it is the better plan. Installing needs an internet connection to download the profile, so doing it at home or at a Thai airport, where you have Wi-Fi or a working Thai SIM, is easier than hunting for a connection after you land abroad. Once installed, there is nothing to reinstall at the destination; you only activate it.
- After installing, open the SIM settings and confirm the eSIM actually appears in the phone's SIM list (iPhone: Settings > Cellular; Samsung: Settings > Connections > SIM manager).
- Give the eSIM line a clear name such as Travel so you do not confuse it with your Thai SIM when choosing mobile data. On iPhone you can rename it under Cellular Plan Label.
- For packages whose validity starts when the eSIM first connects at the destination, you can install early without switching mobile data to the eSIM straight away. Leave data on your Thai SIM, or off, until you arrive.
- When validity starts differs between packages, and some start counting from installation, so read the details of the package you bought before you travel.
- Keep the QR code and eSIM details (including the APN, if one is given) somewhere you can open offline, such as a screenshot in your photo library or a printout.
- Check before buying that the phone supports eSIM and is not carrier-locked. A phone locked to one carrier cannot use an eSIM from another provider.
How do you set up the eSIM on iPhone after landing?
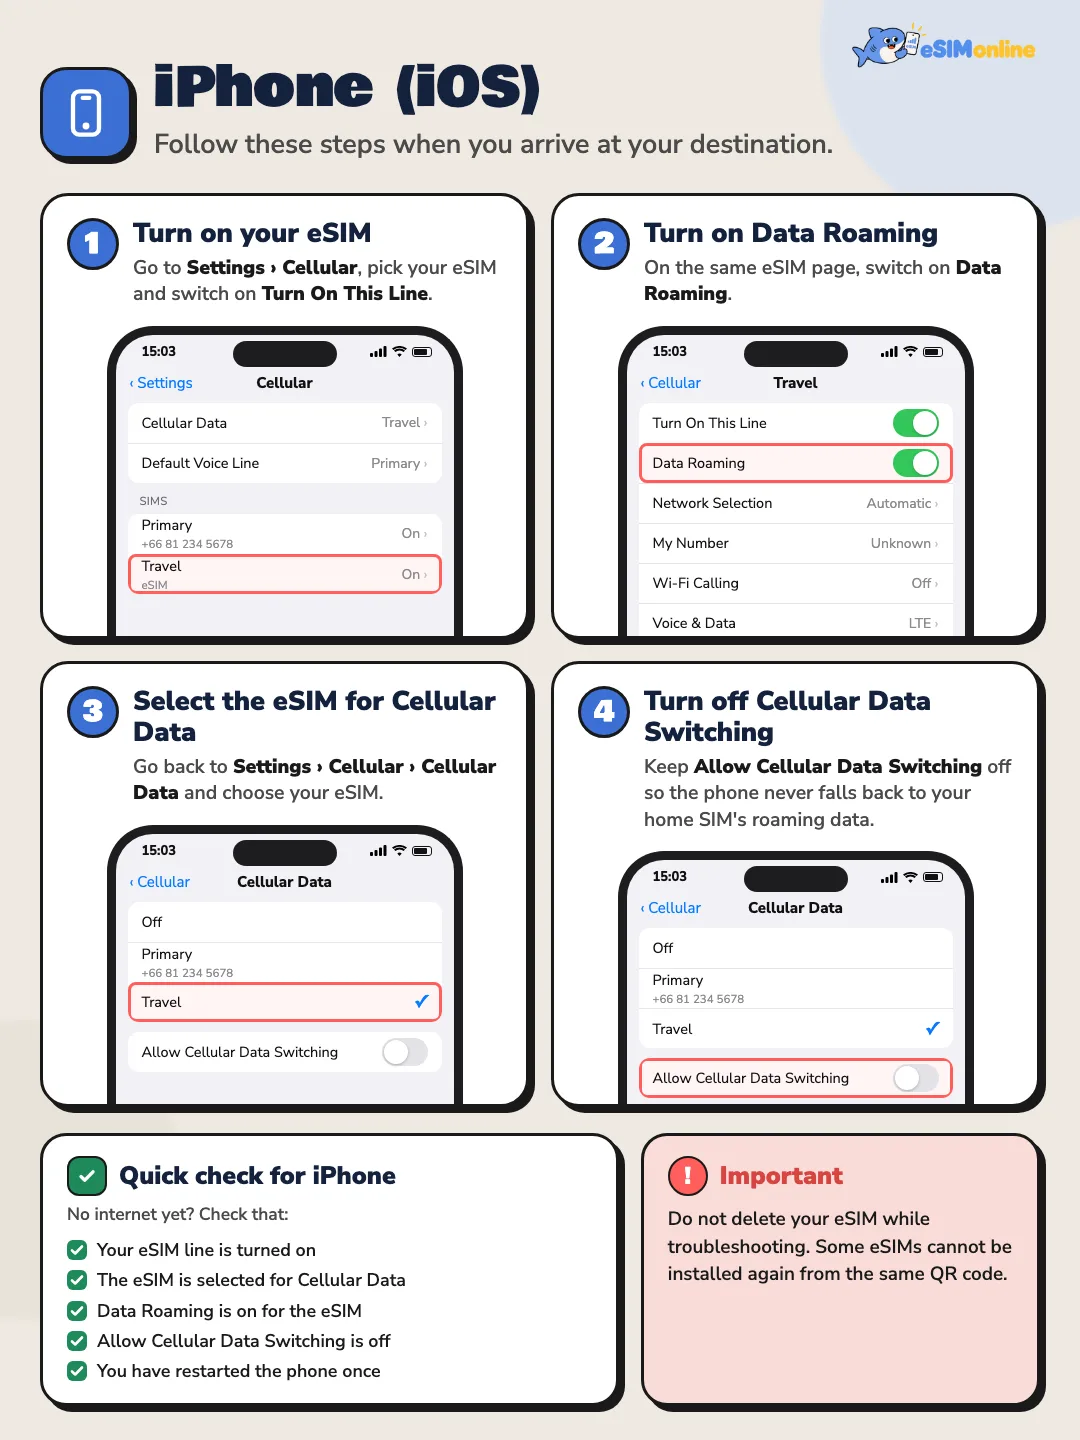
The menus below follow iOS 18 and iOS 26. The main menu is called Cellular; in some regions it is Mobile Data or Mobile Service, but it sits in the same place near Wi-Fi and Bluetooth in Settings.
- 11. Turn the eSIM on (Turn On This Line)Go to Settings > Cellular, tap the eSIM you installed and set Turn On This Line to ON. The eSIM may be labelled Travel, Business, Secondary, Cellular Data or another name the phone assigned automatically. If you cannot find it, scroll to the bottom of the SIM list: a newly installed eSIM usually appears at the bottom.
- 22. Turn on Data RoamingStill on the eSIM's page, set Data Roaming to ON. On some iOS versions it sits under Cellular Data Options. Most travel eSIMs need it, because they connect through a partner network in the destination country.
- 33. Choose the eSIM for Cellular DataGo back to Settings > Cellular > Cellular Data and tap the eSIM. Make sure the ✓ is next to the eSIM, not your Thai SIM. Apple states that only one number at a time can use cellular data.
- 44. Turn off Allow Cellular Data SwitchingOn the same Cellular Data screen, set Allow Cellular Data Switching to OFF. This stops the iPhone from switching to your Thai SIM's data on its own based on coverage, which could lead to data roaming charges from your Thai carrier.
Apple explains that with Allow Cellular Data Switching on, the iPhone switches between your two plans for cellular data based on coverage and availability. While travelling, keep it off so data only runs over the eSIM. One more detail from Apple: when Data Roaming is on for the line you use for data, your voice-only number (the Thai SIM) has Visual Voicemail and MMS disabled.
In iOS 26, Apple says downloading a travel eSIM brings up a setup flow tailored to travel. If the screen asks which line to use for cellular data, choose the eSIM; if it asks for the default line for calls and iMessage, choose your Thai number.

How do you set up the eSIM on a Samsung Galaxy after landing?
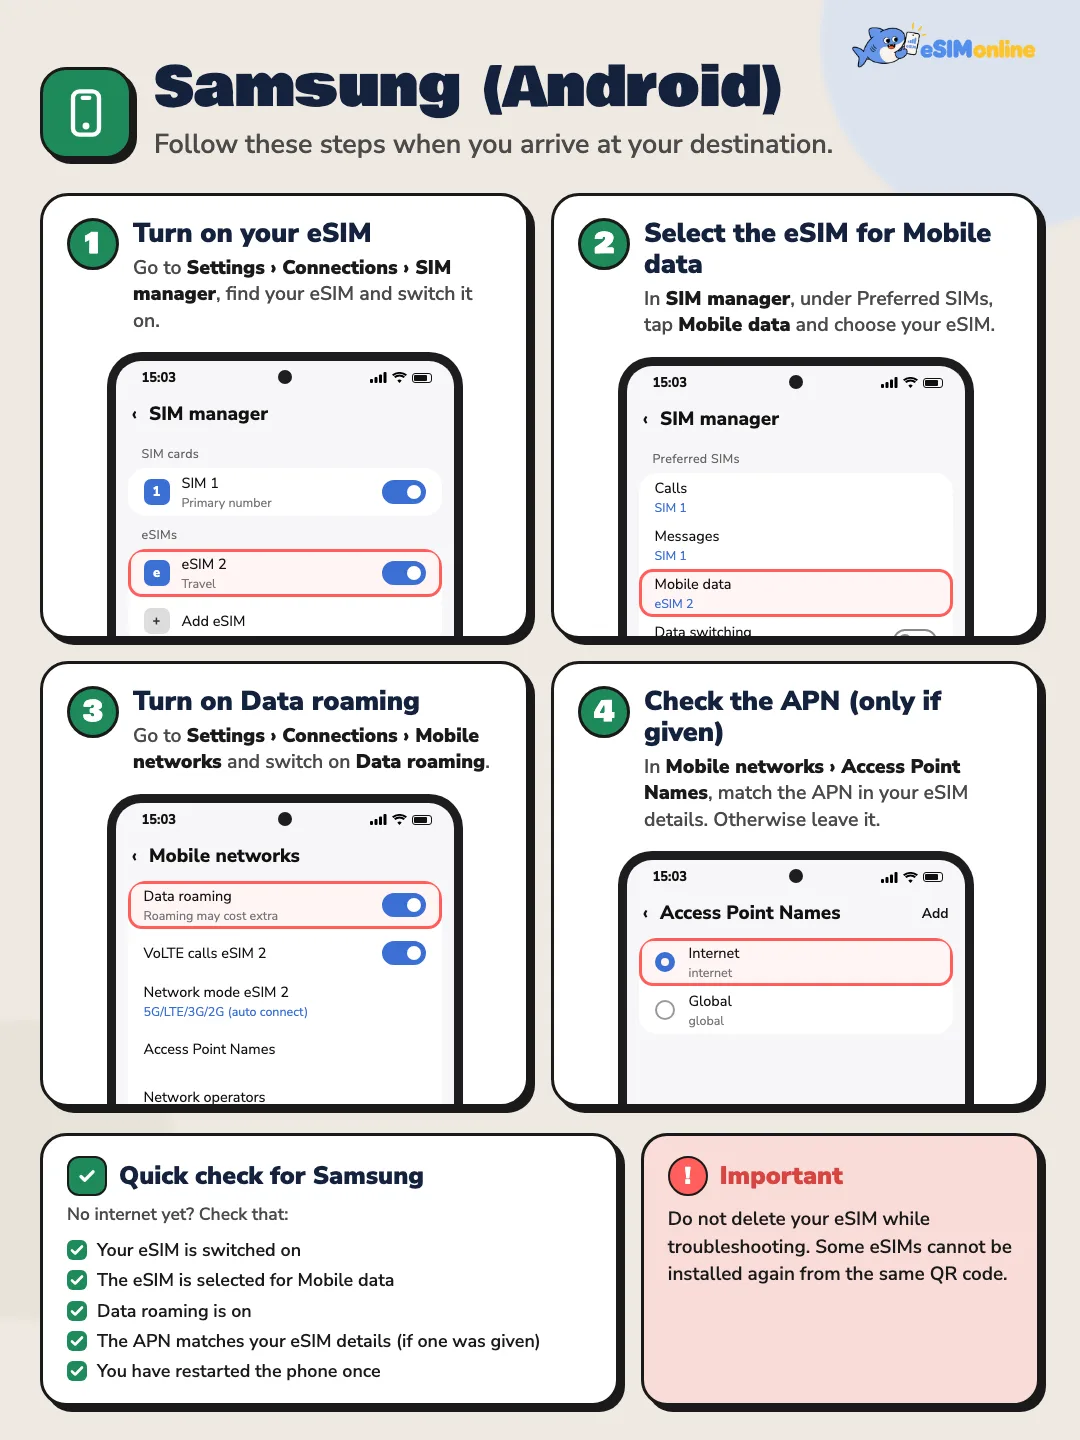
The menus follow One UI 6–8 (Android 14–16). Names can differ slightly by model, version and language; for example Preferred SIMs appears as Preferred SIM card or Primary SIMs on some builds.
- 11. Turn the eSIM on in SIM managerGo to Settings > Connections > SIM manager, find the eSIM you installed and switch it ON. If you have several eSIMs, make sure the one that is on is your travel eSIM.
- 22. Select the eSIM for Mobile dataIn SIM manager, go to Preferred SIMs (or Primary SIMs), tap Mobile data and choose the eSIM. Check that Mobile data is not set to your Thai SIM.
- 33. Turn on Data roamingGo to Settings > Connections > Mobile networks and set Data roaming to ON. If the switch is greyed out, Samsung says to turn on mobile data first under Settings > Connections > Data usage > Mobile data.
- 44. Check the APN only if one is specifiedIf your eSIM details list an APN, open Mobile networks > Access Point Names and check that it matches. If no APN is listed, leave it alone.
Some Galaxy models also have an option that moves mobile data to the other SIM automatically (for example Auto data switch), found in SIM manager or its extra SIM settings. If you see it, turn it off while travelling, for the same reason as Allow Cellular Data Switching on iPhone.
How do you set it up on Pixel, Xiaomi, OPPO, vivo and other Android phones?
Google Pixel, Xiaomi, OPPO, vivo, OnePlus and other Android phones name their menus a little differently, but the principle is the same on every brand: turn the eSIM on, pick it as the SIM for internet, and switch on data roaming in the eSIM's mobile network settings. The table below shows where those three settings live on each brand.
| Setting | iPhone (iOS 18/26) | Samsung (One UI 6–8) | Google Pixel (Android 14–16) | Xiaomi (HyperOS) |
|---|---|---|---|---|
| Turn eSIM on | Cellular > [eSIM] > Turn On This Line | Connections > SIM manager > eSIM switch | Network & internet > SIMs > [eSIM] > Use SIM | SIM cards & mobile networks > [eSIM] > On |
| SIM for mobile data | Cellular > Cellular Data > ✓ eSIM | SIM manager > Preferred/Primary SIMs > Mobile data | Network & internet > SIMs > Mobile data (under Your primary SIMs) | SIM cards & mobile networks > Mobile data / default data SIM |
| Data roaming | Cellular > [eSIM] > Data Roaming | Connections > Mobile networks > Data roaming | Network & internet > SIMs > [eSIM] > Roaming | SIM cards & mobile networks > [eSIM] > Data roaming |
| APN (only if specified) | Cellular > [eSIM] > Cellular Data Network | Mobile networks > Access Point Names | Network & internet > SIMs > [eSIM] > Access point names | SIM cards & mobile networks > [eSIM] > Access Point Names |
Where the three key settings and the APN live on each brand. Menu names vary by version, model and phone language.
- Google Pixel: Google says you choose the data SIM at Settings > Network & internet > SIMs, and only one SIM can be the default for data. Pixel 8a and later have an Automatic data switching toggle on the same screen; keep it off while travelling.
- Xiaomi, Redmi and POCO (HyperOS): the menu is Settings > SIM cards & mobile networks. Tap the eSIM to turn on Data roaming; the data SIM is chosen on the same screen.
- OPPO and OnePlus (ColorOS / OxygenOS): usually Settings > Mobile network (or SIM card & mobile data); tap the eSIM and turn on data roaming, which some versions call International roaming.
- vivo (OriginOS / Funtouch OS): usually Settings > Mobile network; tap the eSIM to turn on data roaming, and pick the data SIM on the same screen.
- If you cannot find a menu on any brand, type roaming into the search bar in Settings; it jumps straight to the switch.

The eSIM is installed but there is no internet: what should you check?
If you have arrived and still cannot get online, work through this list in order, one item at a time. Most cases are solved by the first three.
- ☐ The eSIM is on: the SIM or Cellular page shows the eSIM as ON.
- ☐ The eSIM is selected for mobile data. Installing alone is not enough. iPhone: Settings > Cellular > Cellular Data > choose the eSIM. Samsung: Settings > Connections > SIM manager > Mobile data > choose the eSIM.
- ☐ Data Roaming is on for the eSIM. If it is off, a travel eSIM may not connect to the internet at all, even with signal bars showing.
- ☐ Turn Airplane Mode on for about 10–20 seconds, turn it off, then wait 1–3 minutes while the phone searches for a network again.
- ☐ Restart the phone once, and give it time to register on a network before you test a web page.
- ☐ Network selection is set to Automatic. If your package names a specific partner network, turn Automatic off and pick that network by hand, as listed in the package details.
- ☐ The APN matches your eSIM details (check this only if an APN was given).
- ☐ The package has not expired, still has data left, and covers the country you are in right now.
Where is network selection?
iPhone: Settings > Cellular > tap the eSIM > Network Selection > turn on Automatic. Samsung: Settings > Connections > Mobile networks > Network operators > Select automatically. Pixel: Network & internet > SIMs > tap the eSIM > Automatically select network. If a network you choose manually will not connect, try the next network the package supports, and switch back to Automatic when you move to another city or country.
What does SM-DP+ Status: DISABLED mean, and how do you fix it?
If you check the eSIM's status and see SM-DP+ Status: DISABLED, it generally means the eSIM has been installed on the phone but has not been turned on yet, or has not been selected for mobile data. It does not mean the eSIM is broken or cancelled.
SM-DP+ (Subscription Manager Data Preparation) is the provider-side server that prepares and delivers the eSIM profile to your phone, under GSMA specification SGP.22, which defines Remote SIM Provisioning for consumer devices. In that specification, a profile installed on the phone's eSIM chip (the eUICC) is either Enabled or Disabled, and enabling or disabling it is done from the phone, for example with the Turn On This Line switch. That is why DISABLED can usually be fixed from the phone's own settings.
- 11. Open the SIM or Cellular pageCheck that the eSIM is on (iPhone: Turn On This Line; Samsung: the switch in SIM manager). If you only just installed it, look at the bottom of the SIM list, where a new eSIM usually appears.
- 22. Select the eSIM for mobile dataMake sure the phone is not using your Thai SIM as the SIM for internet.
- 33. Turn on Data RoamingTap the eSIM and turn on Data Roaming, toggle Airplane Mode, then check the status again. If it still says DISABLED after all three, send screenshots to customer support for a check, and do not delete the eSIM.
SGP.22 also lists an Unavailable profile state on the SM-DP+ side, meaning the profile cannot be reused by the SM-DP+. That is why many eSIM QR codes work for one installation only, and it is the technical reason not to delete an eSIM while you troubleshoot.

What is the APN, and do you need to set it for a travel eSIM?
The APN (Access Point Name) tells the phone which gateway of the provider to use for internet. Google describes it as helping your carrier find the right IP address for your phone. Most eSIMs set the APN automatically after installation, so normally you do not need to touch it.
- Some packages do require a manual APN. If your eSIM details list one, enter exactly what you were given, character for character.
- Do not experiment with the APN or copy one from another website; a wrong APN can stop the eSIM connecting at all.
- iPhone: Settings > Cellular > tap the eSIM > Cellular Data Network. If this menu is missing, the provider has locked the settings to automatic.
- Samsung: Settings > Connections > Mobile networks > Access Point Names; select the eSIM as the SIM before editing.
- Pixel: Settings > Network & internet > SIMs > tap the eSIM > Access point names.
Should you turn off your main SIM, or use both SIMs together?
You do not have to turn off your main SIM if you still want calls or SMS on your usual number. Most Dual SIM phones can keep the Thai SIM and the eSIM on together: the eSIM handles internet, and the Thai SIM receives SMS and one-time passwords (OTP) from banks and other services.
Pros
- Thai SIM left on: you receive SMS and bank OTPs, people can still call your usual number, and you do not miss important alerts.
- Thai SIM turned off for the trip: no chance of roaming charges from the Thai SIM, and the battery may last slightly longer because the phone maintains only one network.
Cons
- Thai SIM left on: receiving calls or SMS while roaming may be charged under your Thai carrier's package, so check with AIS, True or dtac before you travel.
- Thai SIM turned off: SMS OTPs cannot arrive, which gets in the way if you need to confirm a transaction during the trip.
If you keep the Thai SIM on, set three things to avoid data roaming charges from it: Cellular Data / Mobile data is set to the travel eSIM, Data Roaming is off for the Thai SIM, and on iPhone Allow Cellular Data Switching is off (on Android, turn off automatic data switching). If you will not need your main SIM at all during the trip, you can turn it off temporarily: on iPhone switch off Turn On This Line for the Thai SIM, on Samsung use its switch in SIM manager, and on Pixel turn off Use SIM.
Still no connection after every step? What to send customer support
If you are at the destination, have done every step and still have no internet, contact customer support. Use airport or hotel Wi-Fi and send the following together in one message so the team can check faster.
- The country and city you are in now
- Your phone model (and iOS or Android version if you know it)
- A screenshot of the Cellular or SIM manager page
- A screenshot of the eSIM's own settings page
- A screenshot of the Data Roaming setting
- A screenshot of the APN / Access Point Names page
- A screenshot or the exact text of any error, such as SM-DP+ Status: DISABLED or No Service
Quick check: landed but no internet? Check these four first
- The eSIM is on
- The eSIM is selected for mobile data
- Data Roaming is on
- Airplane Mode toggled on and off once
In most cases, once every setting is right, the phone connects to the network within a few minutes. If it does not, go back through the checklist above one item at a time, or read the common eSIM mistakes guide for other frequent slips.
FAQ
If I install the eSIM in Thailand before flying, does the package start counting straight away?+
It depends on the package. Many packages start their validity when the eSIM first connects to a network at the destination, so installing early costs no days, but some start from installation. Read the conditions in your package details before installing.
Why do I need Data Roaming on if I bought an eSIM for that country?+
Most travel eSIMs are issued by a provider that does not own the local network, so they connect through a partner network and the phone treats that as roaming. With Data Roaming off, the phone will not send data over that network. Turning roaming on for the eSIM does not create roaming charges on your Thai SIM.
Will turning on Data Roaming for the eSIM trigger roaming charges on my Thai SIM?+
Not if the settings are right. Data roaming is set per SIM: turn it on for the eSIM only, keep it off for the Thai SIM, make the eSIM your mobile data SIM, and on iPhone turn off Allow Cellular Data Switching. The Thai SIM then uses no data abroad.
I have signal bars but no internet. What causes that?+
The usual cause is that the eSIM has not been chosen for mobile data, or its Data Roaming is still off. Signal bars show the phone has found a network, not that it is allowed to send data. Check those two settings, then toggle Airplane Mode.
I cannot find the eSIM in my iPhone's SIM list. What now?+
Scroll to the bottom of Settings > Cellular, because a newly installed eSIM usually sits at the end of the list, possibly under an automatic name such as Travel, Secondary or Business. Apple also suggests opening Control Center to see whether both carriers appear in the status bar. If it really is not there, contact support rather than scanning the QR code again.
Does SM-DP+ Status: DISABLED mean my eSIM is broken or cancelled?+
Generally not. The message usually means the eSIM is installed but not yet turned on, or not selected as the data SIM. Turn the eSIM line on, set it for mobile data and switch on Data Roaming; if the message stays, send screenshots to support.
Can I delete the eSIM and reinstall it with the same QR code?+
Usually not. On many packages the eSIM QR code works only once, and after the profile is deleted the server may refuse a second download. Fix the settings and contact support first; never delete the eSIM as an experiment.
Do I have to turn off my Thai SIM while using the travel eSIM?+
No. If you still want calls, SMS or bank OTPs, leave it on; just turn off Data Roaming for the Thai SIM and make the eSIM your mobile data SIM. If you will not use your Thai number at all on the trip, turning it off temporarily removes any roaming risk.
Do I need to enter an APN for a travel eSIM?+
Usually not; the eSIM sets the APN automatically after installation. Enter one only if your eSIM details specify it, and type it exactly as given. Do not guess or copy an APN from elsewhere.
Does toggling Airplane Mode really help the eSIM connect?+
Often, yes, because it forces the phone to drop its connection and register on the network again. After changing SIM settings, turn Airplane Mode on for about 10–20 seconds, turn it off and wait 1–3 minutes. If that fails, restart the phone once.
Can the esimonline eSIM make calls or receive SMS?+
No. esimonline eSIMs are data-only with no phone number. For calls and SMS use your Thai SIM, or call through apps such as LINE and WhatsApp over the eSIM's data.
When I cross into another country on a multi-country package, do I need to set anything again?+
Normally not. With network selection on Automatic, the phone finds the partner network in the new country by itself. If you picked a network manually earlier, switch back to Automatic and toggle Airplane Mode after crossing the border.
Sources
- Using Dual SIM with an eSIM — Apple Support, September 28, 2026
- Using Dual SIM with two nano-SIM cards — Apple Support, September 28, 2026
- If Dual SIM with eSIM isn't working on your iPhone — Apple Support, September 28, 2026
- About cellular data roaming options for your iPhone and iPad — Apple Support, September 28, 2026
- Set up eSIM on iPhone — Apple Support, September 28, 2026
- SIM cards for your Galaxy phone or tablet — Samsung US, September 28, 2026
- How do I turn international data roaming on or off on my Samsung Galaxy device? — Samsung UK, September 28, 2026
- How to use dual SIMs on your Google Pixel phone — Google Pixel Phone Help, September 28, 2026
- Connect to mobile networks on a Pixel phone — Google Pixel Phone Help, September 28, 2026
- Learn more about eSIMs — Google Pixel Phone Help, September 28, 2026
- SGP.22 RSP Technical Specification v2.2 — GSMA, September 28, 2026
Instagram and TikTok have no web share button, so we open your phone's share sheet or copy the link instead.